
Appearance
How to Filter Locations
Quick Answer
Click the store icon (🏪) in the chat bar at the bottom-left to open the Sites tab. Use the filter controls to narrow down locations by revenue, site type, categories, and more. Toggle "Filtering Map & List" / "Filtering List Only" to connect/disconnect filters from the map display.
Where to Find Filters
Opening the Sites Tab
- Look at the bottom-left of your screen
- Find the chat bar - dark rounded panel
- Look for the store icon (🏪) on the right side
- Click it to open the Sites tab
text
Chat Bar:
┌──────────────────────────────────────────────────────────────────┐
│ [Ask Zeus anything or search for locations...][+][-][🗺️][📚][🏪][🚦][📷][🎓] │
│                                                            ▲      │
│                                                            │      │
│                                          Click here ───────┘      │
└──────────────────────────────────────────────────────────────────┘
The "Filtering Map & List" Toggle
At the top of the Sites tab, you'll see an important control:
What It Does
- Filtering Map & List: Your filter selections are applied to both the map and the list
- Filtering List Only: Filters only affect the list, not the map
How to Use
- Click the button to toggle between enabled and disabled
- When enabled: Map markers appear/disappear based on filters
- When disabled: All markers stay on the map; filters only affect the list view
When to Disconnect
- Viewing the filtered list while keeping full map context
- Comparing a filtered subset to the total portfolio
- Temporary filter exploration without changing the current map view
The Sites Tab Layout
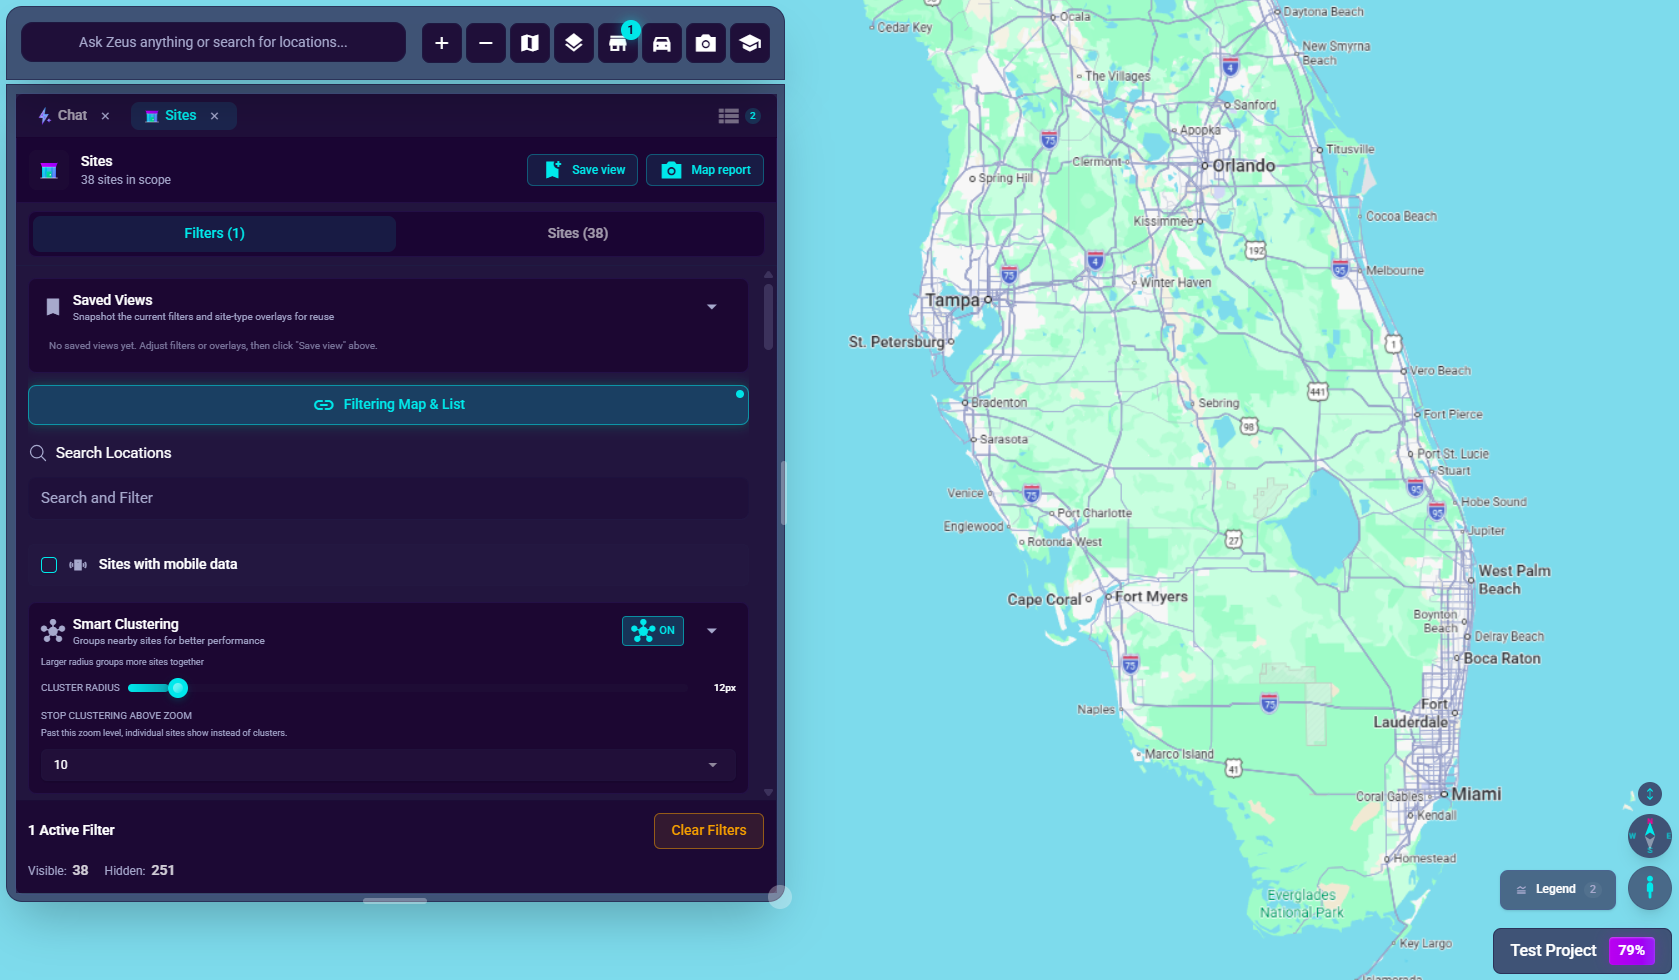
text
┌─────────────────────────────────────┐
│ [Filtering Map & List] (toggle)     │  ◄── Map connection control
├─────────────────────────────────────┤
│ 🔍 Search and Filter                │  ◄── Search + filtering
├─────────────────────────────────────┤
│ FILTERS                             │
│                                     │
│ [✓] 📱 Sites with mobile data       │  ◄── Mobile data availability chip
│                                     │
│ Revenues  (existing sites)  [icon]  │  ◄── Existing-sites revenue card
│   Total Revenue                     │
│   [$0 ─────●─────────── $5M]       │  ◄── Dual-range slider
│                                     │
│ Sites of Interest Metrics           │  ◄── Per-SOI-layer card (when layers
│   [icon] Metric A (Layer 1)         │       carry metric data)
│   [0 ─────●──────────── 500]       │  ◄── Each layer has its own range
│   [icon] Metric B (Layer 2)         │
│   [$0 ─────●─────────── $2M]       │
│                                     │
│ Site Type                           │
│ [✓] Proposed  [✓] Existing         │  ◄── Checkboxes
│                                     │
│ Categories                          │
│ [▼ Select categories...]           │  ◄── Dropdown
│                                     │
│ Attributes  (existing sites) [icon] │  ◄── Custom filters
│ [▼ Select attributes...]           │
├─────────────────────────────────────┤
│ 47/120 sites                        │
│                                     │
│ 📍 Store #123                       │
│    123 Main St, Dallas TX           │
│                                     │
│ 📍 Store #456                       │
│    456 Oak Ave, Houston TX          │
└─────────────────────────────────────┘
Available Filters
Sites with Mobile Data Filter
What it does: When enabled, the Sites list and the map show only sites that have mobile data coverage. Sites without mobile data are hidden.
How to use:
- Open the Sites tab filter panel
- Check the "Sites with mobile data" chip near the top of the filters area
- The chip highlights when active; the map and list update immediately to show only matching sites
- Uncheck the chip to restore all sites
Behavior notes:
- The filter counts as an active filter for map-clearing purposes: when it is on and no sites match, the map clears its markers rather than leaving stale pins from the previous view.
- This filter is independent of the Mobile Data analytics section; you do not need the Mobile Data bundle to use the filter chip.
- The filter state is saved per project and restored when you return.
Search and Filter
What it does: Find locations by name, address, or other text fields How to use:
- Click the
Search and Filterfield - Type search terms (e.g., "Dallas downtown")
- Results filter as you type
- Add another term and use the inline AND / OR toggle on that row to choose whether it narrows results (AND) or broadens them (OR) relative to the previous term
Revenues Filter (Existing Sites)
What it does: Shows only existing portfolio sites within a revenue range.
The filter card is labeled Revenues with an "(existing sites)" tag in the header to distinguish it from the Sites of Interest Metrics card below. It contains a Total Revenue section with a dual-range slider scoped to your existing and proposed portfolio sites.
How to use:
- Find the Revenues card and expand the Total Revenue section
- Drag the left handle to set a minimum revenue
- Drag the right handle to set a maximum revenue
- Values update in real-time
- The list and map update to show only matching locations
Include N/A Toggle (appears when filter is active):
- What it does: Controls whether sites with missing revenue data are shown
- When unchecked (default): Sites without revenue are hidden when the filter is active
- When checked: Sites without revenue are included in results
- Use case: Find all sites in a revenue range PLUS sites with no revenue data yet
Sites of Interest Metrics Filter
What it does: Filters each Sites of Interest (SOI) layer by its own configured metric range. This card appears only when the project has SOI layers that carry metric data.
SOI layers can be configured with different metric types in Revenue Grades (visit counts, rankings, dollar revenue, or custom units). Each layer gets its own independent filter section so you can, for example, filter "Competitor" layer sites by visit count while separately filtering a "Trade Area Benchmarks" layer by dollar revenue.
What you see:
- The card is labeled Sites of Interest Metrics with a layers icon
- One section per revenue-bearing SOI layer, each showing:
- The layer's numbered marker icon
- The metric label configured for that layer (e.g., "Weekly Visits (Layer 1)")
- A dual-range slider displaying values in the layer's configured units
- Low / Medium / High preset buttons
- An Include N/A toggle
How to use:
- Open the Sites tab filter panel
- Scroll to the Sites of Interest Metrics card (below the Revenues card)
- Locate the layer you want to filter
- Drag the slider handles or click a preset button (Low / Medium / High) to set a range
- The Sites list and map update to show only layer sites within that range
Behavior notes:
- Each layer filter is independent — setting a range on Layer 1 does not affect Layer 2
- A layer section only appears when that layer has sites with metric values
- Metric formats match what is configured in Revenue Grades for each layer (currency, count, rank, or custom units)
- Per-layer filter ranges are saved per project and reset when you switch to a different project
- If you remove a layer from the project, its saved filter range is cleared automatically
Include N/A Toggle (per layer):
- When unchecked (default): Layer sites without a metric value are hidden when the filter is active
- When checked: Layer sites without a metric value are included in results
Site Type Filter
What it does: Show/hide proposed vs. existing locations How to use:
- Find the Site Type checkboxes
- Check "Proposed" to show proposed sites
- Check "Existing" to show existing sites
- Uncheck either to hide that type
Site type meanings:
- Proposed: Sites not yet built (Consideration, Approved, LOI, In Development, etc.)
- Existing: Operating sites (Mature, New, Non-Traditional, Closed)
Category Filter
What it does: Filter by business category or status subcategory How to use:
- Find the Categories dropdown
- Click to open the dropdown
- Select categories to include
- Click away to close and apply
Attribute Filters
What they do: Filter by custom attributes specific to your project Examples: State, region, opening date, owner, franchise group, etc. How to use: Similar to category - select from dropdown options
Include N/A Toggle (appears when filter is active):
- What it does: Controls whether sites with missing attribute data are shown
- When unchecked (default): Sites without the filtered attribute are hidden
- When checked: Sites without the filtered attribute are included in results
- Example: Filter by "State = California" with N/A checked shows California sites PLUS sites with no state data
Understanding N/A (Missing Data) Filtering
What is N/A Data?
N/A means "Not Available" - sites that don't have data for a specific field:
- Revenue N/A: Sites without revenue information
- Attribute N/A: Sites missing a custom attribute (state, region, etc.)
Default Behavior
When you activate a filter:
- Sites with N/A data are excluded by default
- This prevents incomplete data from appearing in filtered results
- Example: Filter "Revenue > $1M" hides sites with no revenue data
Including N/A Data
Each filter has an "Include N/A" checkbox that appears when the filter is active:
When to check "Include N/A":
- You want to see sites that match the filter OR have missing data
- You're identifying sites that need data entry
- You want a complete view including incomplete records
When to leave unchecked:
- You only want sites with confirmed data in the filtered range
- You're analyzing performance (need actual numbers)
- You're creating reports requiring complete data
Examples
Example 1: Finding High Revenue Sites
Goal: Show only sites with revenue over $2M
Setup:
- Set revenue minimum to $2M
- Leave "Include N/A" unchecked
- Result: Only sites with revenue ≥ $2M appear
Why: Sites without revenue data don't meet the criteria
Example 2: Finding Sites Needing Revenue Data
Goal: Show high-revenue sites AND sites missing revenue
Setup:
- Set revenue minimum to $2M
- Check "Include N/A"
- Result: Sites with revenue ≥ $2M PLUS sites with no revenue data
Why: Useful for identifying data gaps while reviewing top performers
Example 3: State Filter with N/A
Goal: Show California sites and sites with no state assigned
Setup:
- Select "California" in State attribute filter
- Check "Include N/A"
- Result: California sites PLUS sites without state data
Why: Helps find sites that need state assignment
Filtering Step by Step
Example: Find High-Revenue Proposed Sites
- Click the store icon (🏪) in the chat bar
- Ensure
Filtering Map & Listis enabled - In Site Type: Uncheck "Existing", keep "Proposed" checked
- In Revenue Range: Drag the left handle to your minimum (e.g., $2M)
- Watch the map: Only matching locations remain visible
- Browse the list: Filtered locations appear below
Example: Find Sites in a Specific Category
- Click the store icon (🏪)
- Click the Categories dropdown
- Select your category (e.g., "Mature")
- Map and list show only locations in that category
Example: Search by Name or Address
- Click the store icon (🏪)
- Click the search box at the top
- Type location name or address (e.g., "Dallas" or "Main Street")
- Results filter as you type
Understanding Filter Indicators
Filtering Map & List Button
| State | Color | Meaning |
|---|---|---|
| Filtering Map & List | Teal | Filters affect both list and map |
| Filtering List Only | Red | Filters affect list only |
Active Filter Count
- The Filters tab may show a count (e.g., "Filters (3)")
- Indicates number of active filter criteria
Location Count
- Shows how many locations match current filters
- Example: "47/120 sites"
Clearing Filters
Clear One Filter
- Click the X next to a filter value
- Reset a slider to full range
- Uncheck specific options
Clear All Filters
- Look for the "Clear Filters" button in the filter footer
- Click to remove all filters at once
- All locations become visible again
Using Chat to Filter
You can also filter by asking the AI:
Examples:
- "Show me proposed sites only"
- "Filter to locations with revenue over $1 million"
- "Find sites in California"
- "Show me stores in the Dallas area"
- "Which locations are in the Mature category?"
The AI applies filters for you automatically.
Filter Combinations
Combine multiple filters for precise results:
| Goal | Filters to Use |
|---|---|
| High-potential new sites | Site Type: Proposed + Revenue: High range |
| Underperforming stores | Site Type: Existing + Revenue: Low range |
| Regional analysis | Site Type: Both + Attribute: State/Region |
| Mature performers | Category: Mature + Revenue: Above AUV |
| Sites with mobile data in a category | Sites with mobile data chip + Category filter |
Tips for Effective Filtering
Start Broad, Then Narrow
- Start with one filter
- Review results
- Add more filters to narrow further
- Avoid over-filtering (too many = no results)
Use the Map While Filtering
- Watch markers disappear/appear as you filter
- Helps visualize your filter effects
- Click remaining markers to verify they match
"Filtering Map & List" Strategy
- Keep Filtering Map & List enabled for focused analysis
- Switch to Filtering List Only to explore filters without changing the map
- Reconnect when you've found the right combination
Sorting Results
Available Sort Options
- Name (A-Z or Z-A)
- Revenue (High to Low or Low to High)
- Date (Newest or Oldest)
- Distance (if a reference point is set)
How to Sort
- Find the sort dropdown or toggle
- Select your preferred sort order
- List reorders immediately
Exporting Filtered Results
The Sites tab header includes a download icon button (tooltip: "Export filtered results") that downloads the current filtered list as a CSV file.
What the CSV contains
The export includes one row per location that matches your active filters, using the same order as the current sort. Columns:
| Column | Content |
|---|---|
| ID | Internal location identifier |
| Name | Location name |
| Address | Street address (fields with commas are correctly quoted per RFC 4180) |
| City | City |
| State | State or province |
| Postal | ZIP or postal code |
| Type | Site type (e.g., Proposed, Existing) |
| Revenue | The site's total revenue, using your project's configured metric label (defaults to "Revenue"); always blank for Proposed and search-result rows |
How to export
- Apply your filters to narrow the list to the set you want
- Click the download icon in the Sites tab header
- Your browser downloads a file named
filtered-locations-<timestamp>.csv
The export always reflects the currently filtered and sorted view. If Filtering List Only is active (red), the export still uses whatever filters are active in the panel.
Troubleshooting
No Results After Filtering
- Filters may be too restrictive
- Try removing one filter at a time
- Check if filters conflict (e.g., revenue range excluding all)
- Check "Include N/A" toggles - You may be excluding sites with missing data
- Clear all filters and start fresh
Filter Not Working
- Refresh the page
- Check internet connection
- Verify the filter is actually selected
- Try a different filter first
Map Not Updating
- Check whether
Filtering Map & Listis enabled - If it reads
Filtering List Only, click it again to re-enable map-linked filtering - Refresh the page if needed
Can't Find the Filters
- Click the store icon (🏪) in the chat bar
- Look in the Sites tab of the secondary workspace
- Ask the AI: "Where are the filters?"
Saving a Filter Combination for Later
Once you have the filters tuned to a useful state, you can save the combination as a Saved View so you can reload it in one click later or share it with your team. The Save view button appears in the Sites tab header and is enabled once at least one filter is active. A Saved Views card above the filter panel lists all views for the current project.
See Saved Views in the Sites Tab for full details on saving, loading, sharing, and managing saved views.